Basic iOS Application Tutorial
Welcome to the API Ninjas basic iOS application tutorial! In this tutorial you'll learn how to build and run a simple nutrition calculator iOS app using Swift and SwiftUI. We'll cover the following technologies/concepts:
Xcode project setup
Swift
SwiftUI toolkit
Making HTTP API calls
Prerequisites:
Mac with internet connection
Valid API Ninjas API key (get a free one here)
Xcode installed
You can also download the finished code from our Github repository: https://github.com/API-Ninjas/API-Ninjas-basic-example-iOS
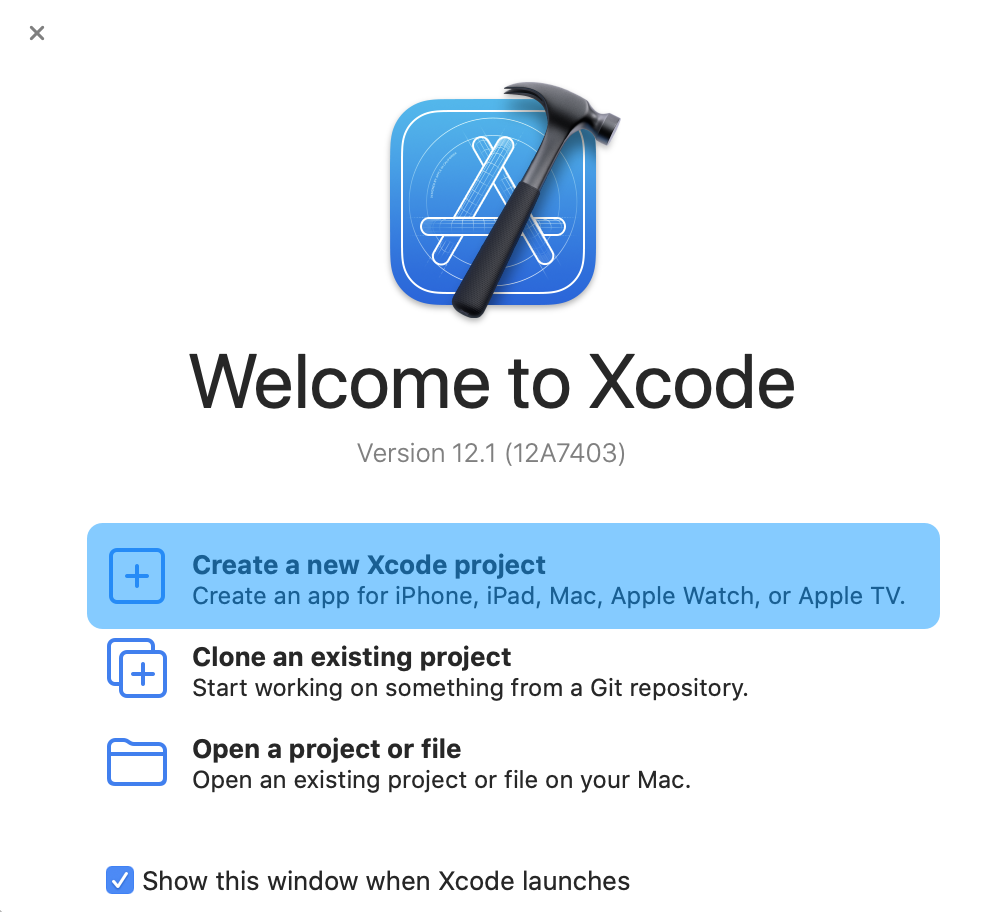
New Project Setup
Let's begin by creating a new Xcode project. Open Xcode on your Mac and click on "Create a new Xcode project":
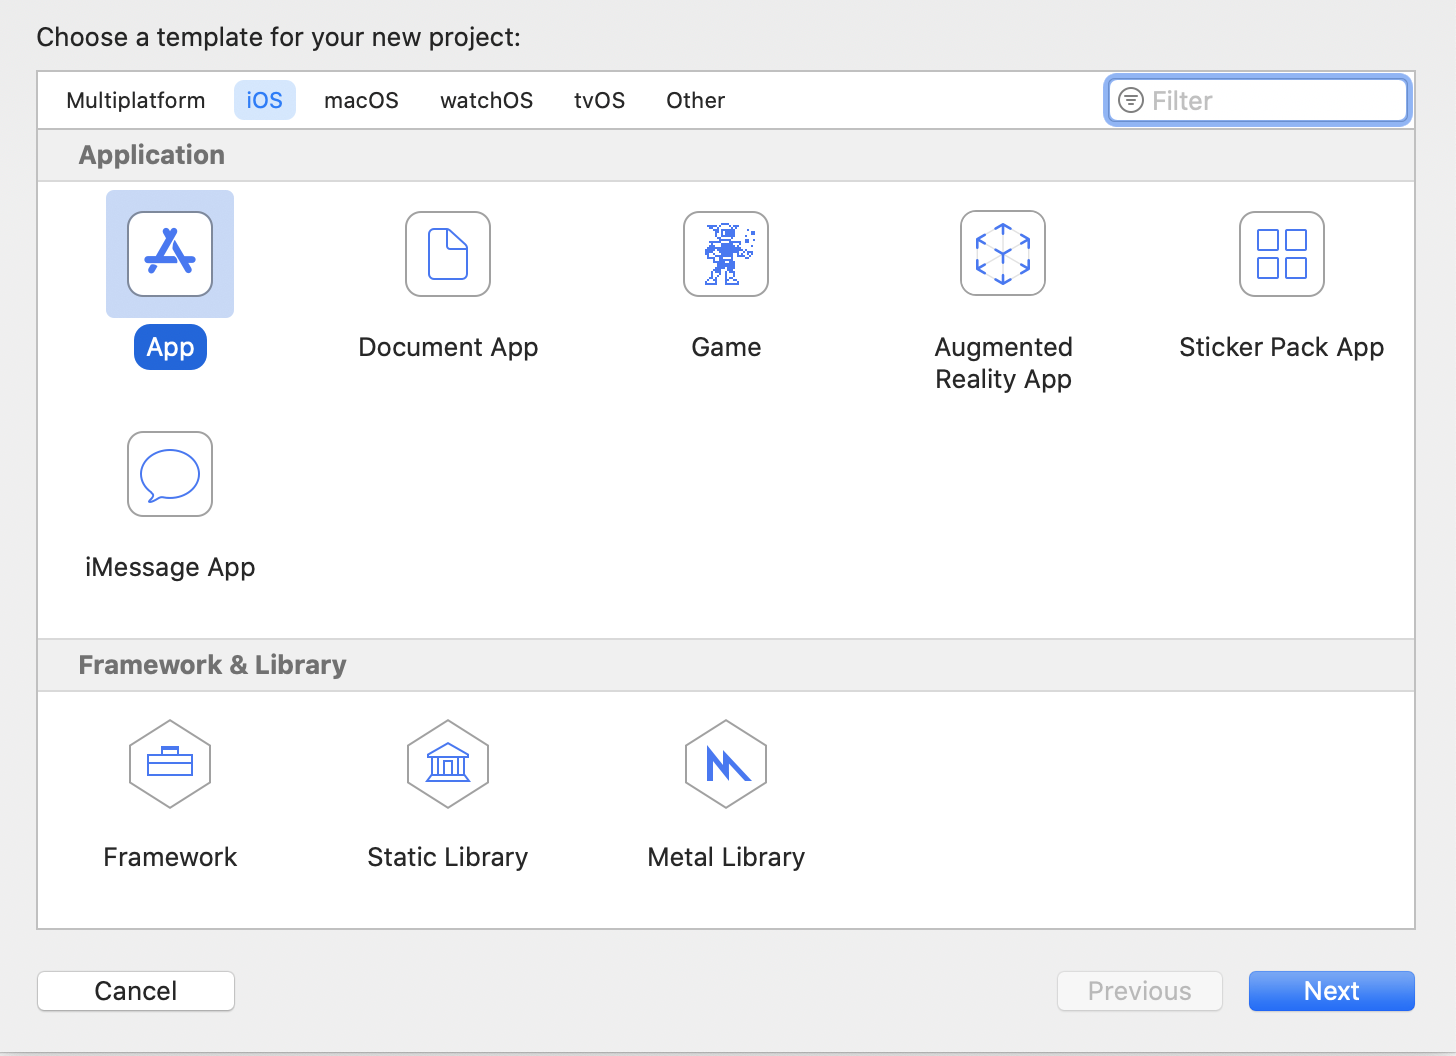
Choose the "App" option on the next screen:
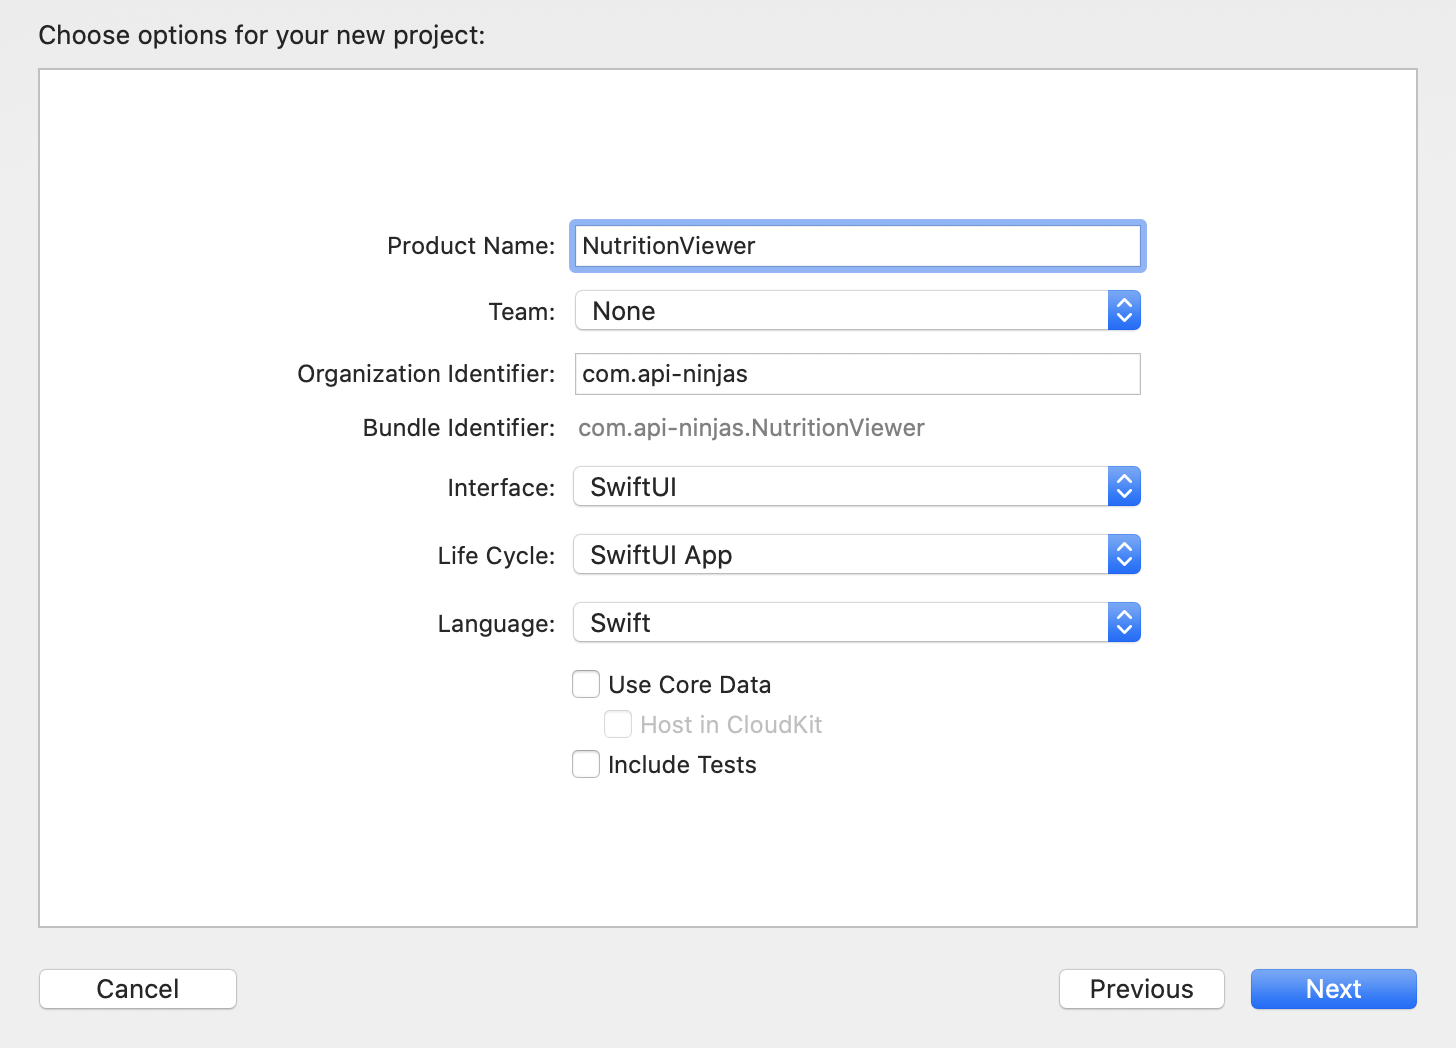
On the next page, let's name our app "NutritionViewer" and copy the following settings:
After clicking "Create", you should be taken to the editor window. It should look like this:
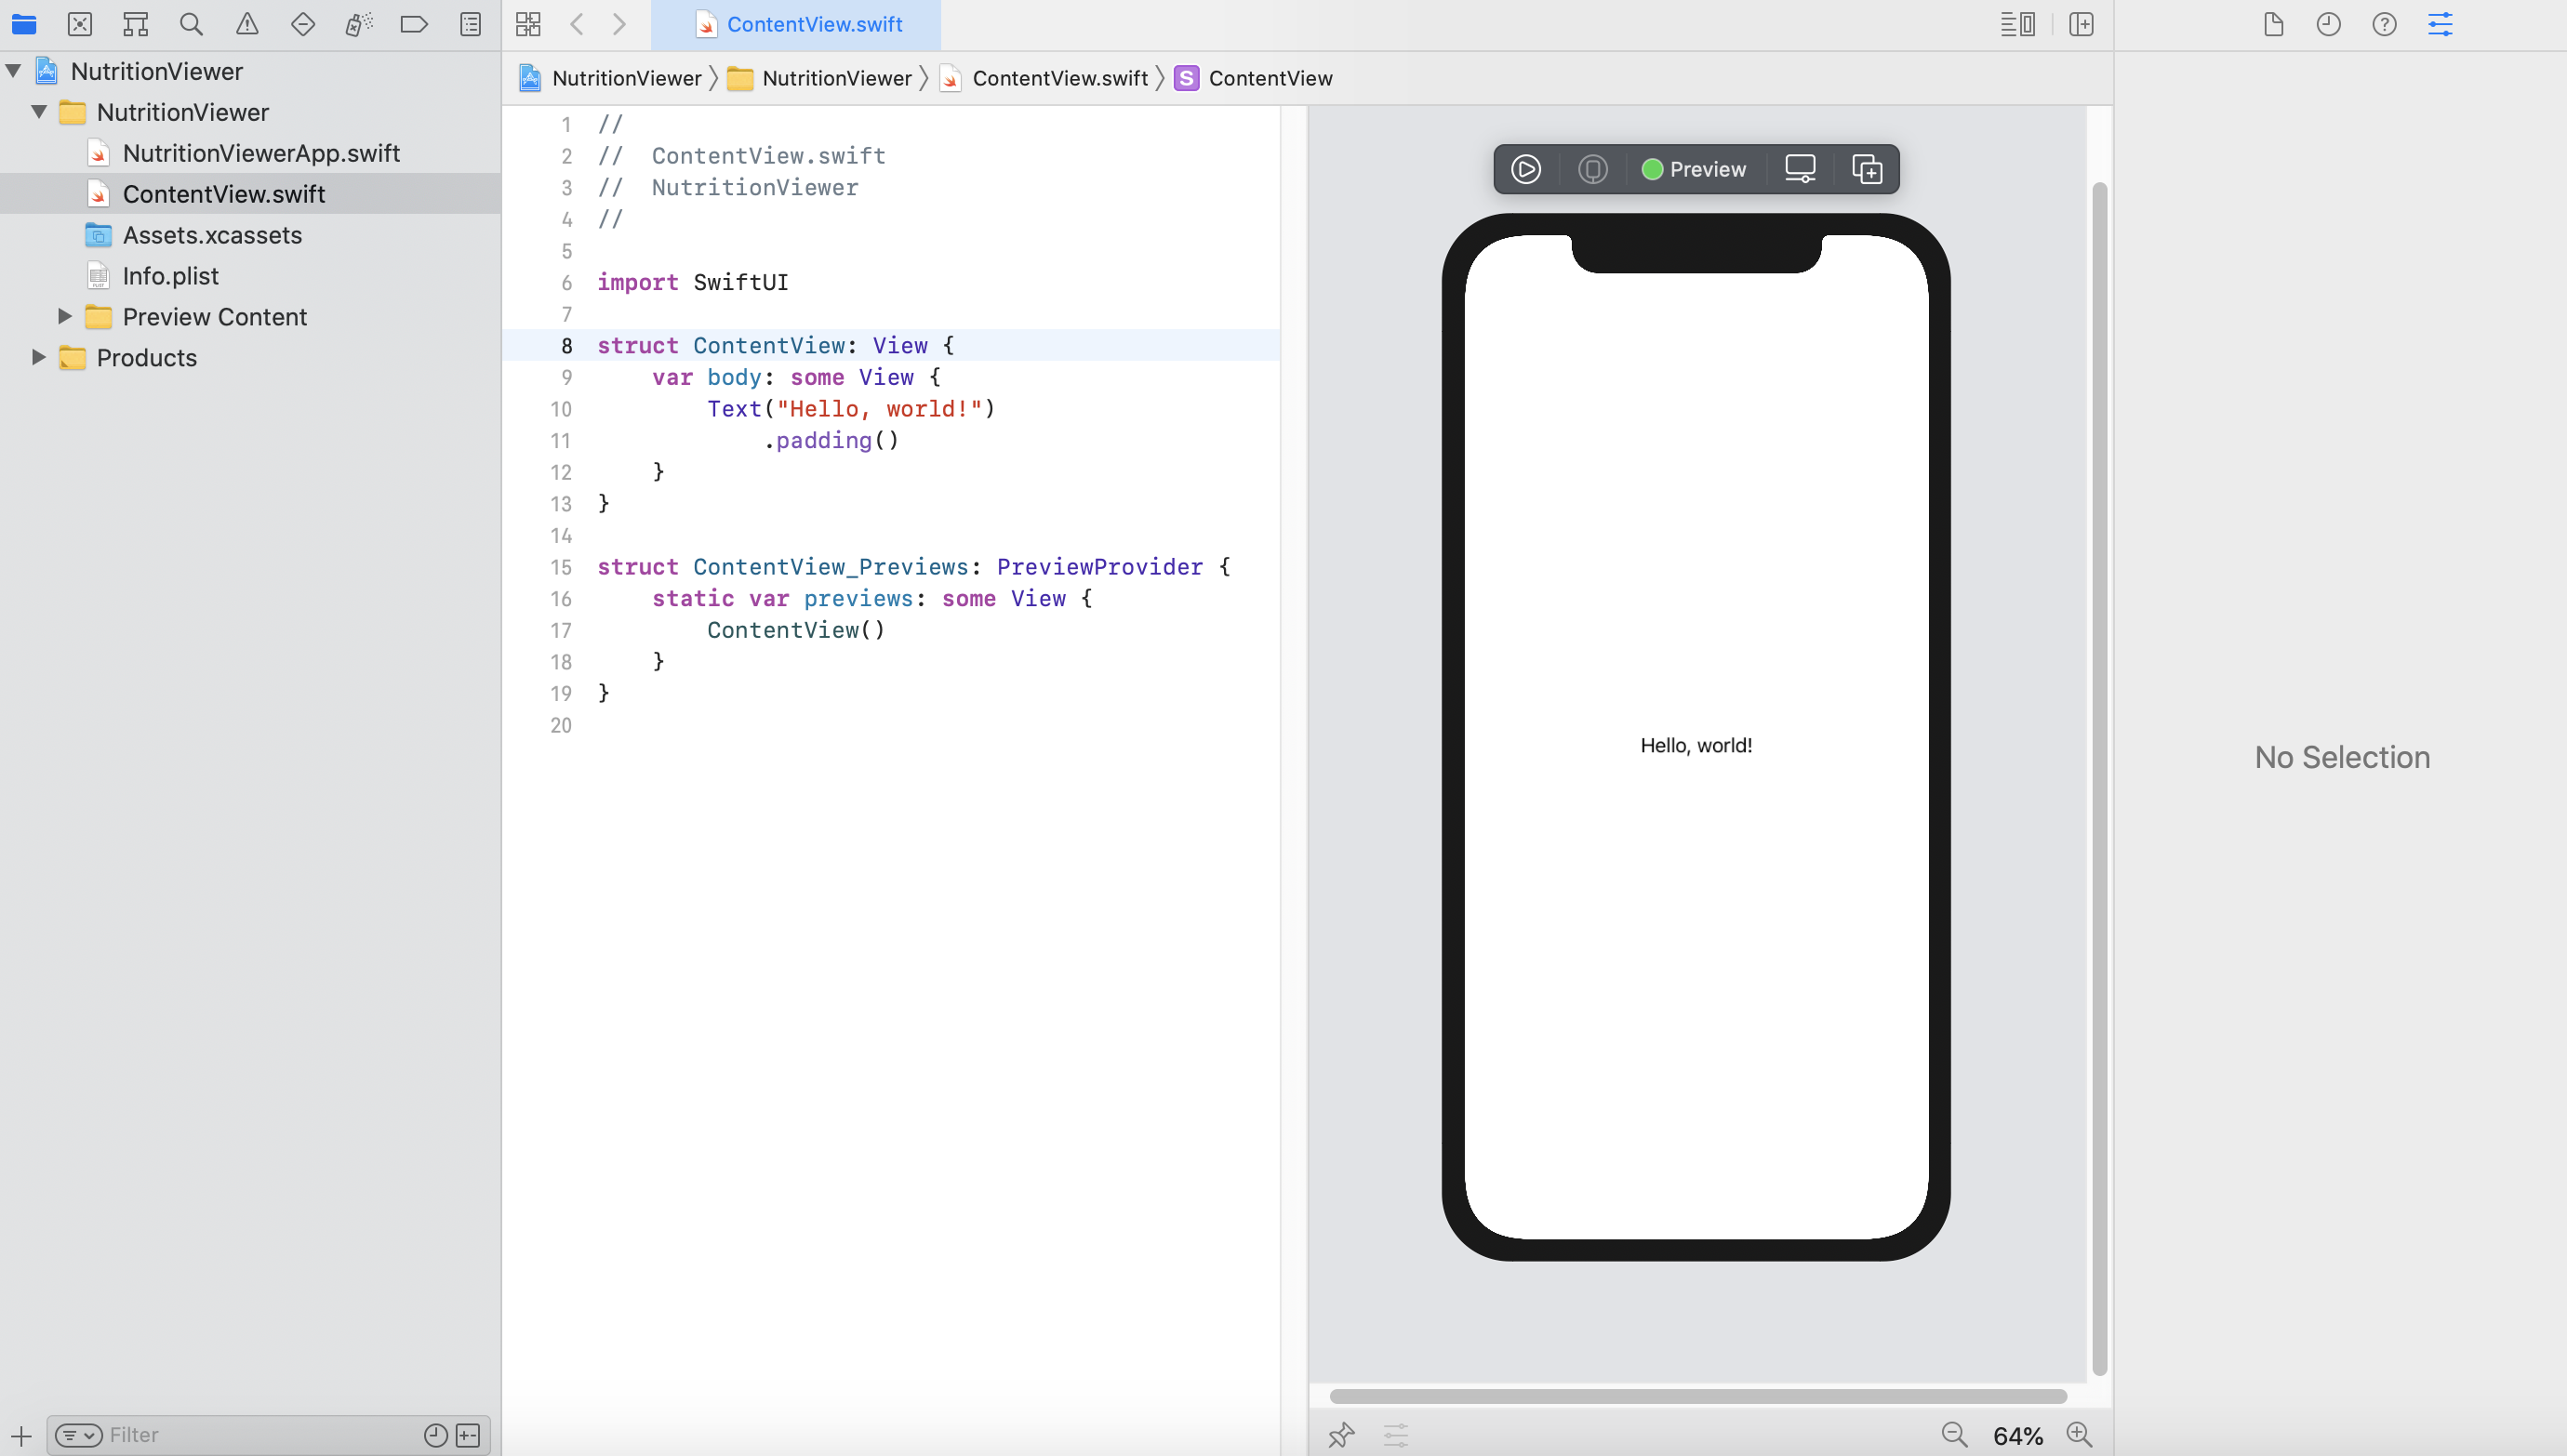
If you do not see the split-screen window with the simulator on the right, you can type option + command + return to enter this mode.
Create JSON data model
The nutrition API we'll be using returns data in JSON format with specific properties. We can create a model with these predefined properties to easily decode the data later on.
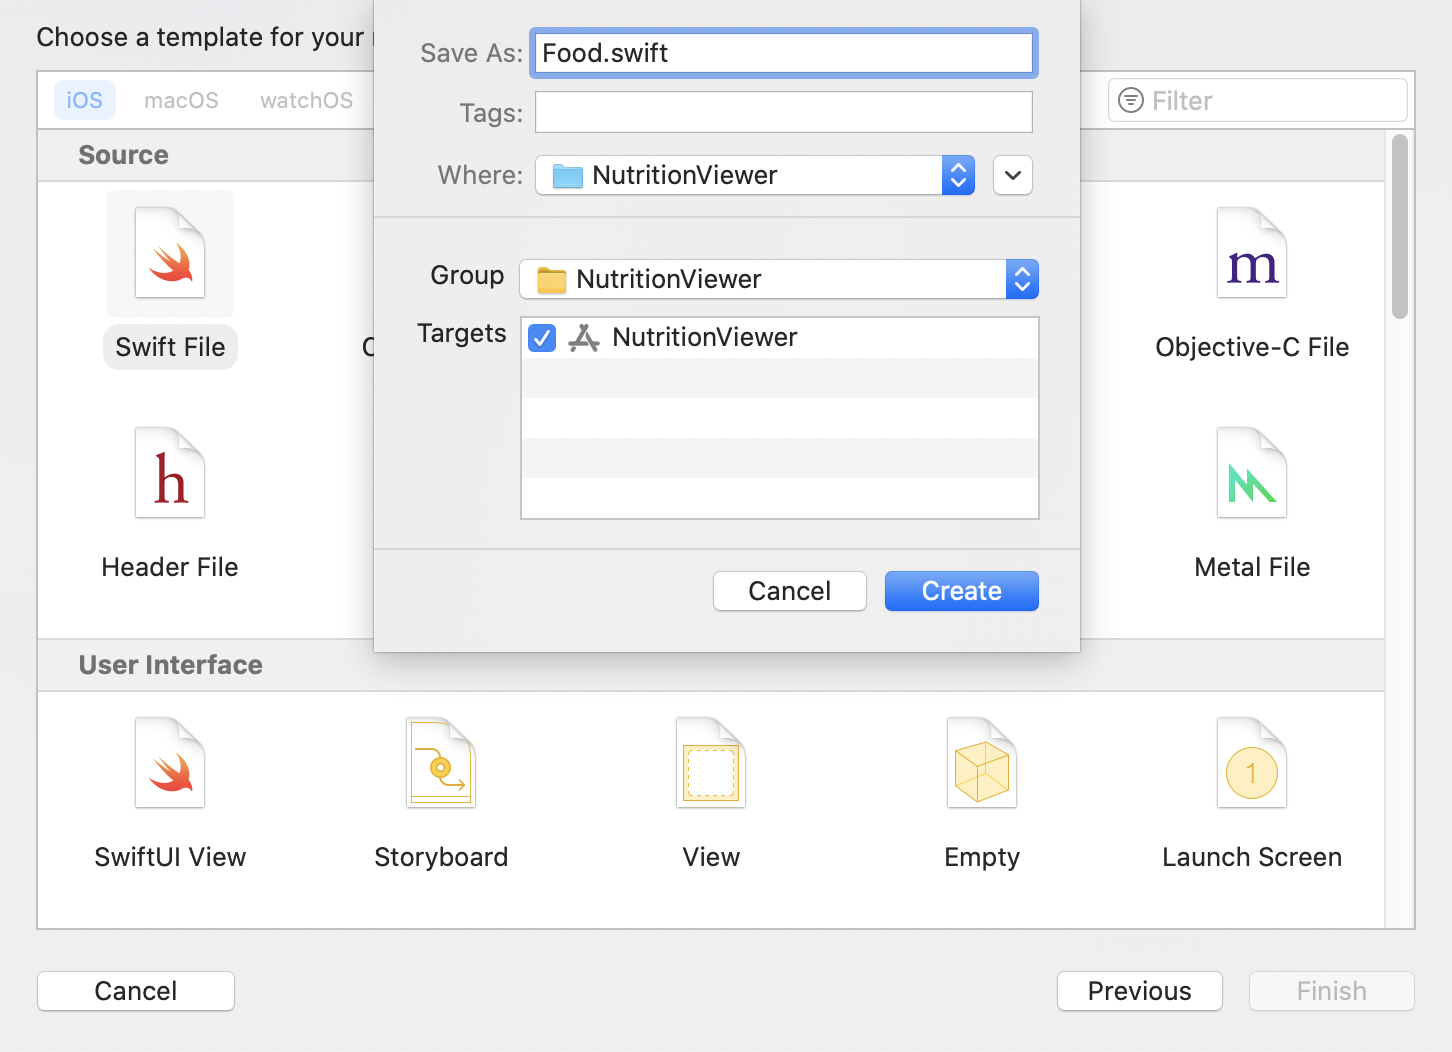
Let's first create a new Swift file command + N called Food.swift:
Inside this file we are going to define a struct Food that conforms to the Codable and Identifiable protocols.
Codable is used for decoding and encoding the JSON data we get from our API call.
Identifiable is used to help us make a unique identifier for our Food object so our app can keep track of it and properly display it.
//
//  Food.swift
//  NutritionViewer
//

import Foundation

struct Food: Codable, Identifiable {
    let id = UUID()
    var name: String
    var calories: Double
    var serving_size_g: Double
    var fat_total_g: Double
    var fat_saturated_g: Double
    var protein_g: Double
    var sodium_mg: Double
    var potassium_mg: Double
    var cholesterol_mg: Double
    var carbohydrates_total_g: Double
    var fiber_g: Double
    var sugar_g: Double
}
Making API Calls
To make the actual API call, we'll introduce a few new classes:
ObservableObject is a protocol that’s part of the Combine framework. It is used within a custom class/model to keep track of the state. The ObservableObject protocol is used with some sort of class that can store data, the @ObservedObject property wrapper is used inside a view to store an observable object instance, and the @Published property wrapper before any properties that should trigger change notifications. Just placing @Published before a property is enough to have it update any SwiftUI views that are watching for changes
URLSession provides an API for downloading data from and uploading data to endpoints indicated by URLs. Your app creates one or more URLSession instances, each of which coordinates a group of related data-transfer tasks. URLSession has a singleton shared session for basic requests.
DispatchQueue is an object that manages the execution of tasks serially or concurrently on your app’s main thread or on a background thread. We will use this object to asynchronously send the signal to update our UI once we receive nutrition data back from the server.
Asynchronicity is key here because making network requests such as HTTP API calls can take an unpredictable amount of time, and we don't want to block our app on receiving data.
In the same Food.swift file, let's create an Api class using the types above (don't forget to fill in your API key!):
class Api : ObservableObject{
    @Published var foods = [Food]()

    func loadData(completion:@escaping ([Food]) -> ()) {
        let query = "1lb brisket and fries".addingPercentEncoding(withAllowedCharacters: .urlQueryAllowed)
        let url = URL(string: "https://api.api-ninjas.com/v1/nutrition?query="+query!)!
        var request = URLRequest(url: url)
        request.setValue("YOUR_API_KEY", forHTTPHeaderField: "X-Api-Key")
        URLSession.shared.dataTask(with: request) { data, response, error in
            let foods = try! JSONDecoder().decode([Food].self, from: data!)
            print(foods)
            DispatchQueue.main.async {
                completion(foods)
            }
        }.resume()
    }
}
Your Food.swift class should now look like this:
import Foundation
struct Food: Codable, Identifiable {
let id = UUID()
var name: String
var calories: Double
var serving_size_g: Double
var fat_total_g: Double
var fat_saturated_g: Double
var protein_g: Double
var sodium_mg: Double
var potassium_mg: Double
var cholesterol_mg: Double
var carbohydrates_total_g: Double
var fiber_g: Double
var sugar_g: Double
}
class Api : ObservableObject{
@Published var foods = [Food]()
func loadData(completion:@escaping ([Food]) -> ()) {
let query = "1lb brisket and fries".addingPercentEncoding(withAllowedCharacters: .urlQueryAllowed)
let url = URL(string: "https://api.api-ninjas.com/v1/nutrition?query="+query!)!
var request = URLRequest(url: url)
request.setValue("YOUR_API_KEY", forHTTPHeaderField: "X-Api-Key")
URLSession.shared.dataTask(with: request) { data, response, error in
let foods = try! JSONDecoder().decode([Food].self, from: data!)
print(foods)
DispatchQueue.main.async {
completion(foods)
}
}.resume()
}
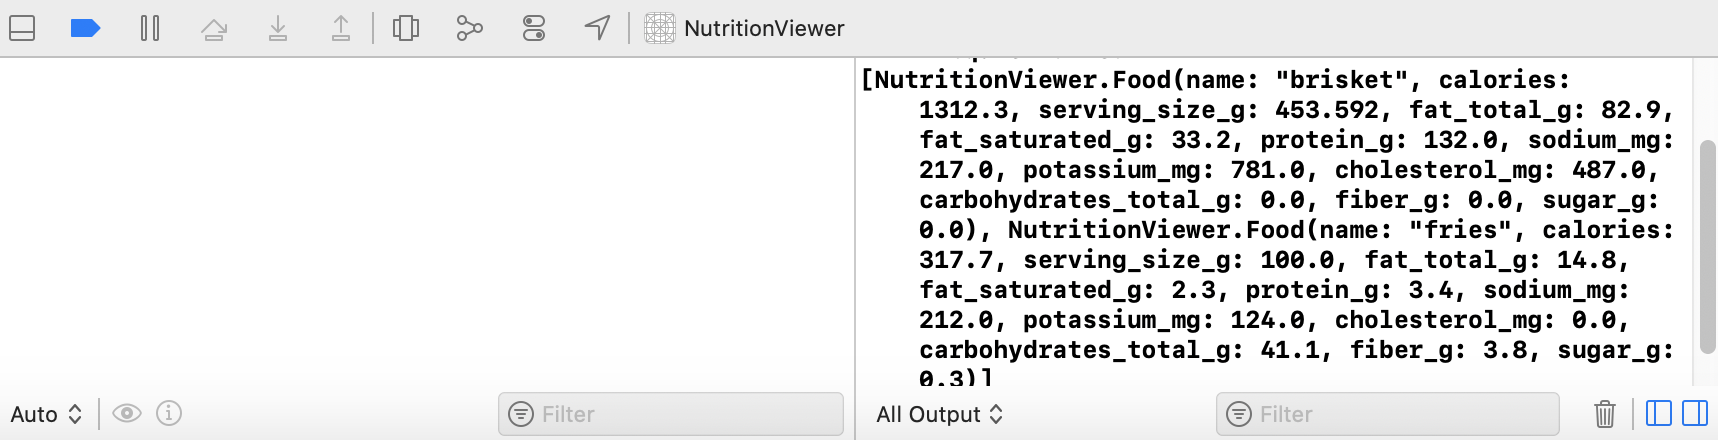
} Now try running your project in the simulator. After letting the simulator run your app for a few seconds check the console at the bottom of your Xcode window and you should see some nutrition data being printed:
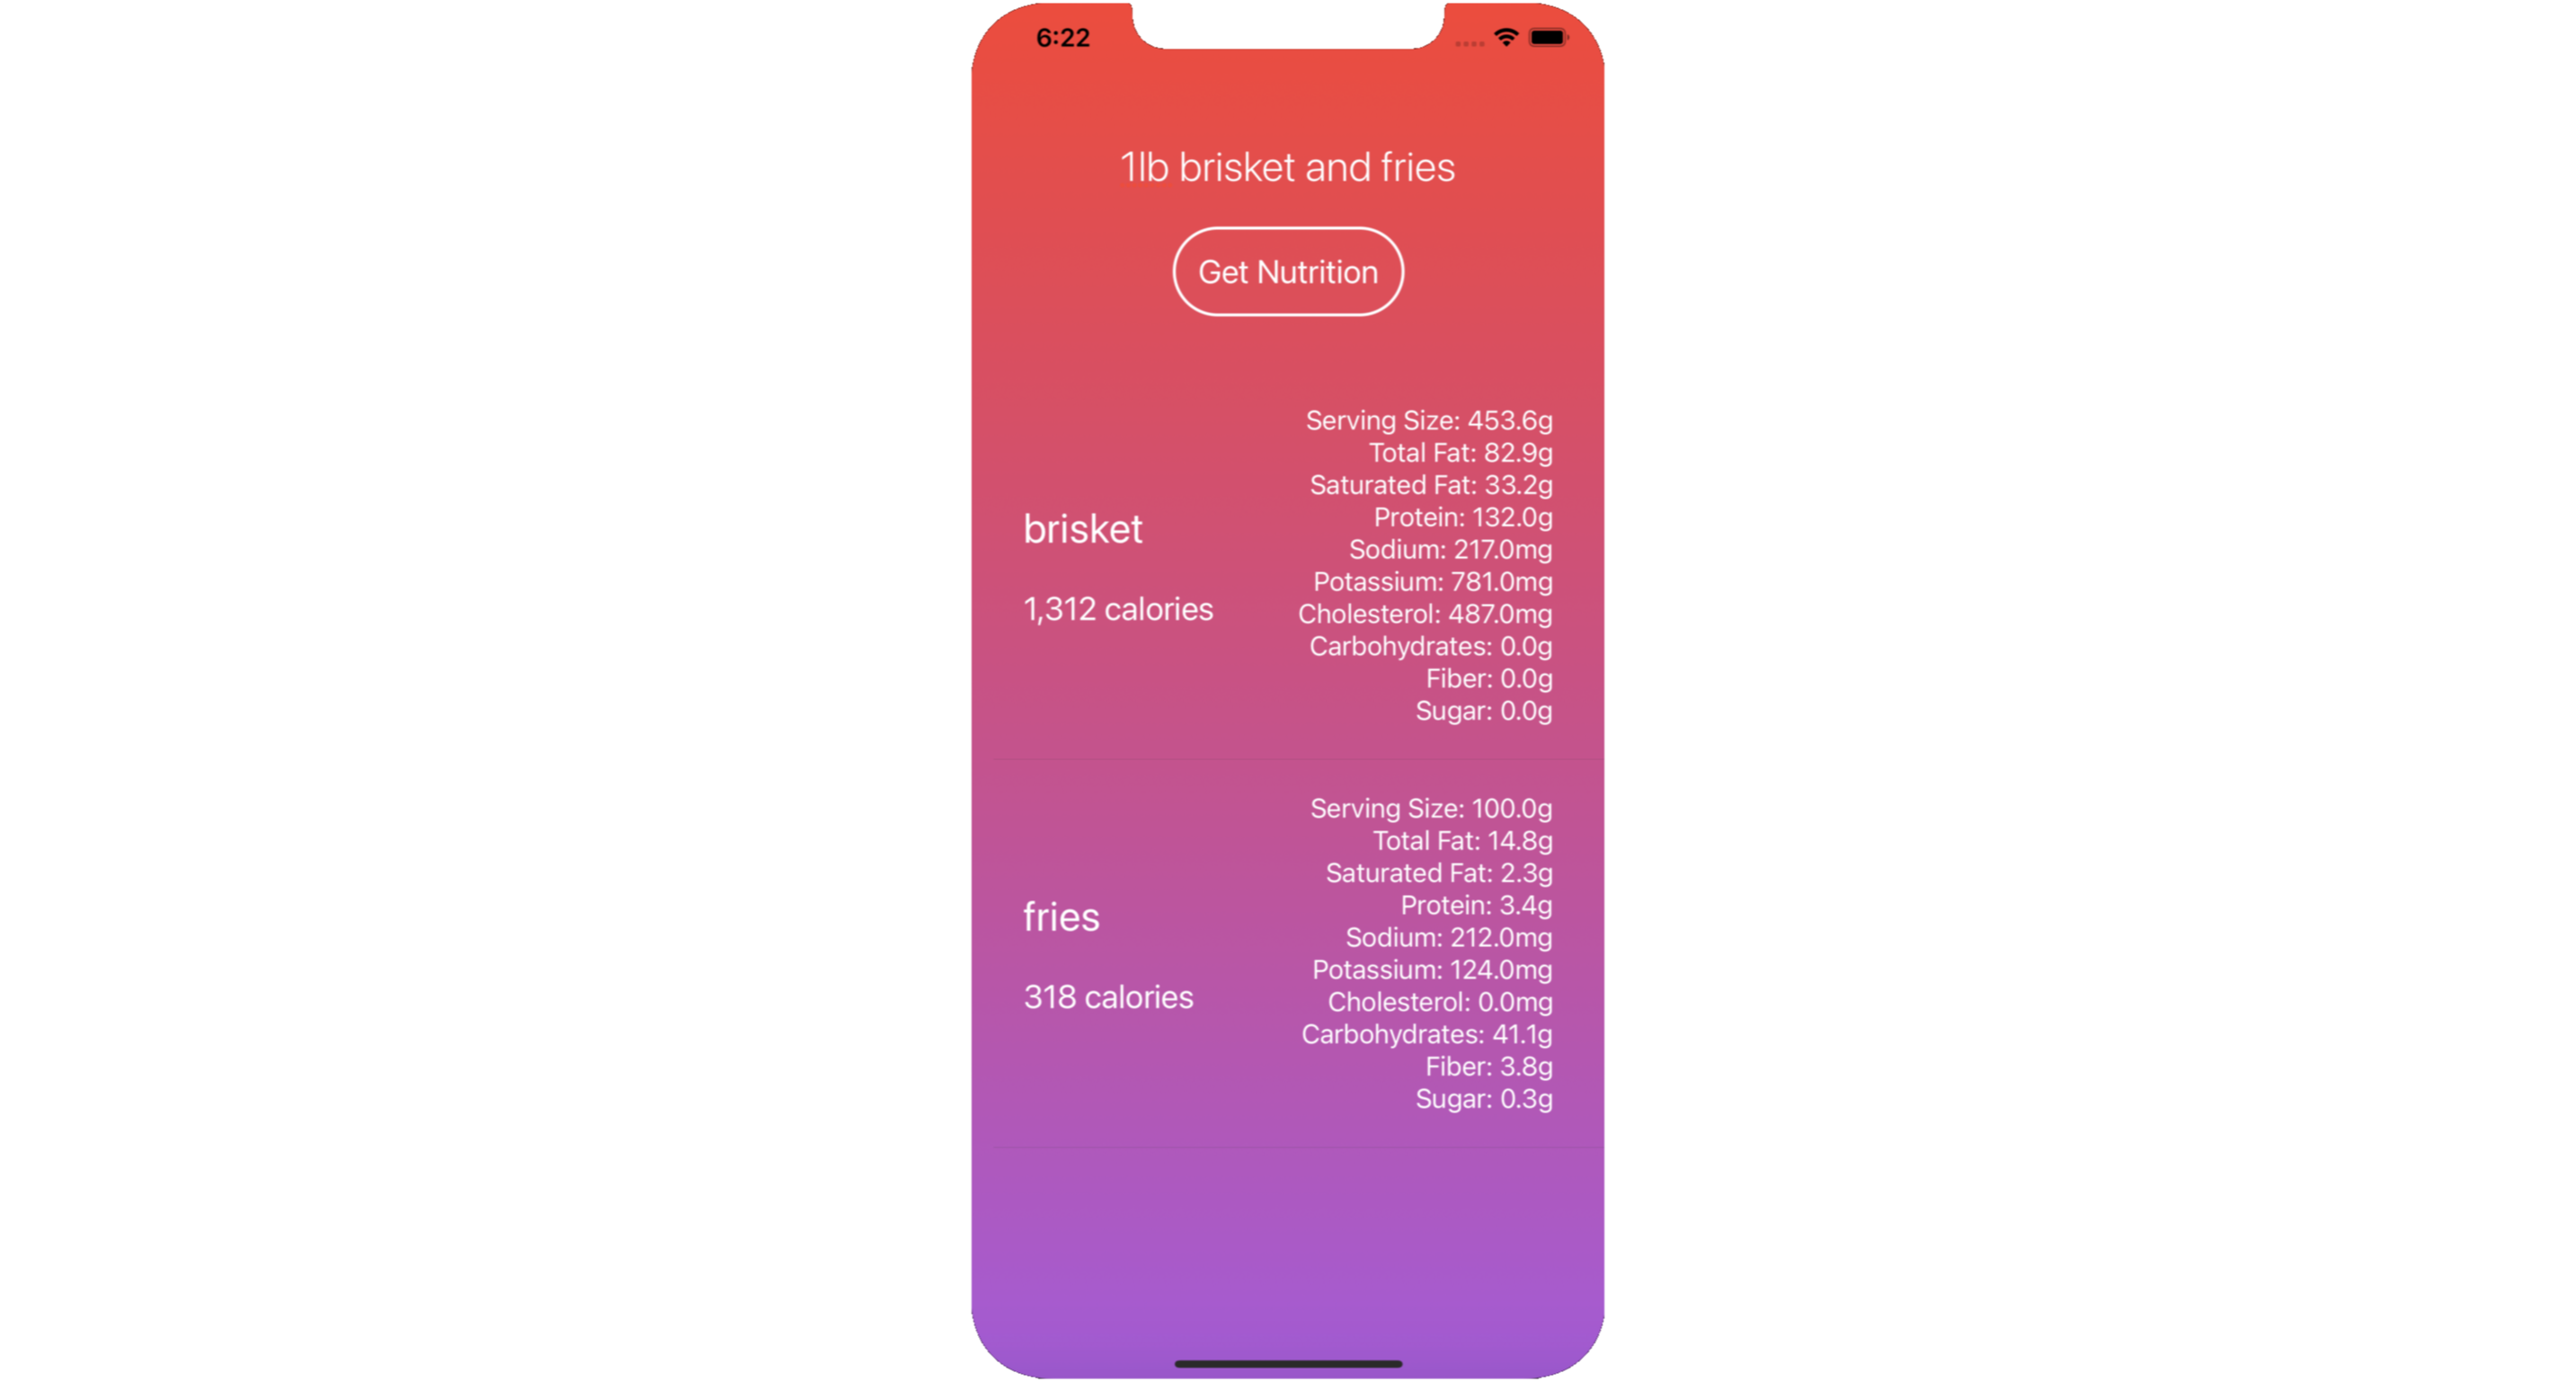
Displaying Results
In the final part of this tutorial we'll make the app interactive and display the nutrition data instead of just printing it to the console.
Let's open up ContentView.swift and define some members and initialize table view background colors to clear (we'll set the color in the next step):
struct ContentView: View {

@State var foods = [Food]()
@State var query: String = ""

init() {
    UITableView.appearance().backgroundColor = .clear
    UITableViewCell.appearance().backgroundColor = .clear
}

var body: some View {
    ...
}
Next, just below init() let's add a function to load our API data and store the results:
func getNutrition() {
    Api().loadData(query: self.query) { (foods) in
        self.foods = foods
    }
}
Finally, let's display the results in a table using SwiftUI:
var body: some View {
LinearGradient(gradient: Gradient(colors: [Color.red, Color.purple]), startPoint: .top, endPoint: .bottom)
    .edgesIgnoringSafeArea(.vertical)
    .overlay(
        VStack(alignment: .leading) {
            VStack {
                TextField(
                    "Enter some food text",
                    text: $query
                )
                .multilineTextAlignment(.center)
                .font(Font.title.weight(.light))
                .foregroundColor(Color.white)
                .padding()
                HStack {
                    Spacer()
                    Button(action: getNutrition) {
                        Text("Get Nutrition")
                            .padding()
                            .overlay(
                                RoundedRectangle(cornerRadius: 50)
                                    .stroke(Color.white, lineWidth: 2)
                            )
                    }
                    .font(.title2)
                    .foregroundColor(Color.white)
                    Spacer()
                }
            }
            .padding(30.0)
            List {
                ForEach(foods) { food in
                    HStack {
                        VStack(alignment: .leading) {
                            Text("(food.name)")
                                .font(.title)
                                .padding(.bottom)
                            Text("(food.calories, specifier: "%.0f") calories")
                                .font(.title2)
                        }
                        .minimumScaleFactor(0.01)
                        Spacer()
                        VStack(alignment: .trailing) {
                            Text("Serving Size: (food.serving_size_g, specifier: "%.1f")g")
                            Text("Total Fat: (food.fat_total_g, specifier: "%.1f")g")
                            Text("Saturated Fat: (food.fat_saturated_g, specifier: "%.1f")g")
                            Text("Protein: (food.protein_g, specifier: "%.1f")g")
                            Text("Sodium: (food.sodium_mg, specifier: "%.1f")mg")
                            Text("Potassium: (food.potassium_mg, specifier: "%.1f")mg")
                            Text("Cholesterol: (food.cholesterol_mg, specifier: "%.1f")mg")
                            Text("Carbohydrates: (food.carbohydrates_total_g, specifier: "%.1f")g")
                            Text("Fiber: (food.fiber_g, specifier: "%.1f")g")
                            Text("Sugar: (food.sugar_g, specifier: "%.1f")g")
                        }
                        .minimumScaleFactor(0.01)
                        .font(.system(size: 18.0))
                    }
                    .listRowBackground(Color.clear)
                    .foregroundColor(.white)
                    .padding()
                }
            }
        }
    )
}
Here, we use a few different classes from SwiftUI
TextField: default UI element for text input.
HStack: A view that arranges its children in a horizontal line.
VStack: A view that arranges its children in a vertical line.
Spacer: A flexible space that expands within the axis in which it's stacked (e.g. expands horizontally inside an HStack).
In SwiftUI each view element can contain a chain of modifiers to change various visual attributes of the element. For example, Text("Hello World!").foregroundColor(.red) will change the text color to red.
Your ContentView.swift file should now look like this:
import SwiftUI

struct ContentView: View {

@State var foods = [Food]()
@State var query: String = ""

init(){
    UITableView.appearance().backgroundColor = .clear
    UITableViewCell.appearance().backgroundColor = .clear
}

func getNutrition() {
    Api().loadData(query: self.query) { (foods) in
        self.foods = foods
    }
}

var body: some View {
    LinearGradient(gradient: Gradient(colors: [Color.red, Color.purple]), startPoint: .top, endPoint: .bottom)
        .edgesIgnoringSafeArea(.vertical)
        .overlay(
            VStack(alignment: .leading) {
                VStack {
                    TextField(
                        "Enter some food text",
                        text: $query
                    )
                    .multilineTextAlignment(.center)
                    .font(Font.title.weight(.light))
                    .foregroundColor(Color.white)
                    .padding()
                    HStack {
                        Spacer()
                        Button(action: getNutrition) {
                            Text("Get Nutrition")
                                .padding()
                                .overlay(
                                    RoundedRectangle(cornerRadius: 50)
                                        .stroke(Color.white, lineWidth: 2)
                                )
                        }
                        .font(.title2)
                        .foregroundColor(Color.white)
                        Spacer()
                    }
                }
                .padding(30.0)
                List {
                    ForEach(foods) { food in
                        HStack {
                            VStack(alignment: .leading) {
                                Text("(food.name)")
                                    .font(.title)
                                    .padding(.bottom)
                                Text("(food.calories, specifier: "%.0f") calories")
                                    .font(.title2)
                            }
                            .minimumScaleFactor(0.01)
                            Spacer()
                            VStack(alignment: .trailing) {
                                Text("Serving Size: (food.serving_size_g, specifier: "%.1f")g")
                                Text("Total Fat: (food.fat_total_g, specifier: "%.1f")g")
                                Text("Saturated Fat: (food.fat_saturated_g, specifier: "%.1f")g")
                                Text("Protein: (food.protein_g, specifier: "%.1f")g")
                                Text("Sodium: (food.sodium_mg, specifier: "%.1f")mg")
                                Text("Potassium: (food.potassium_mg, specifier: "%.1f")mg")
                                Text("Cholesterol: (food.cholesterol_mg, specifier: "%.1f")mg")
                                Text("Carbohydrates: (food.carbohydrates_total_g, specifier: "%.1f")g")
                                Text("Fiber: (food.fiber_g, specifier: "%.1f")g")
                                Text("Sugar: (food.sugar_g, specifier: "%.1f")g")
                            }
                            .minimumScaleFactor(0.01)
                            .font(.system(size: 18.0))
                        }
                        .listRowBackground(Color.clear)
                        .foregroundColor(.white)
                        .padding()
                    }
                }
            }
        )
}
}

struct ContentView_Previews: PreviewProvider {
static var previews: some View {
    ContentView()
}
}
Now let's run our app in the simulator again and see the final result. Try typing different query strings into the textfield to see different food nutrition data load in real time!